Skip to content
New issue

Have a question about this project? Sign up for a free GitHub account to open an issue and contact its maintainers and the community.

By clicking “Sign up for GitHub”, you agree to our terms of service and privacy statement. We’ll occasionally send you account related emails.

Already on GitHub? Sign in to your account

GitLab CI 应用 #71

Open
hanxi opened this issue May 12, 2021 · 0 comments
Open

GitLab CI 应用 #71

hanxi opened this issue May 12, 2021 · 0 comments
Labels

Comments

@hanxi
Copy link
Owner

hanxi commented May 12, 2021

GitLab CI 是什么

  • CI - 持续集成 (Continuous Integration)
  • DevOps 工具
  • 用通俗的话讲,就是帮我们自动做事情的工具

持续整合,又译为持续集成,是一种软件工程流程,是将所有软件工程师对于软件的工作副本持续集成到共享主线的一种举措。该名称最早由葛来迪·布区在他的布区方法中提出,在测试驱动开发的作法中,通常还会搭配自动单元测试。持续集成的提出主要是为解决软件进行系统集成时面临的各项问题,极限编程称这些问题为集成地狱。

DevOps(Development 和 Operations 的组合词)是一种重视“软件开发人员(Dev)”和“IT 运维技术人员(Ops)”之间沟通合作的文化、运动或惯例。透过自动化“软件交付”和“架构变更”的流程,来使得构建、测试、发布软件能够更加地快捷、频繁和可靠。

类似产品:

  • Jenkins
  • Travis CI
  • GitHub Actions

Jenkins 大家都很熟悉,维基百科这样介绍的:
Jenkins 是一款由 Java 编写的开源的持续集成工具。在与 Oracle 发生争执后,项目从 Hudson 项目复刻。 Jenkins 提供了软件开发的持续集成服务。它运行在 Servlet 容器中。

在 GitHub Actions 出来之前,Travis CI 是 GitHub 上最火的持续集成服务。
Travis CI 是在软件开发领域中的一个在线的,分布式的持续集成服务,用来构建及测试在 GitHub 托管的代码。这个软件的代码同时也是开源的,可以在 GitHub 上下载到,尽管开发者当前并不推荐在闭源项目中单独使用它。

GitHub Actions 旨在帮助您建立强大而动态的自动化。 本指南说明如何创建包括环境变量、定制化脚本等的 GitHub Actions 工作流程。

GitLab CI 能干什么?

比如这些事情:

  • 每次提交完代码后,执行代码检查
  • 每天定时打出一个包
  • 点个按钮触发打包

gitlabcicd流程.png

功能限制:

目前我们用的版本为 11.6.3 ,还不支持在 pipeline 时输入参数,版本 13.7 已经支持在网页里输入相关参数再执行流程。

因为我们打 patch 是需要输入版本号的,所以打 patch 现在是手动在命令行里运行脚本的。

GitLab Runner 安装

GitLab Runner 安装是用来执行 CI 脚本的载体,至少需要安装一个 Runner 来执行 CI 脚本。

GitLab Runner 支持多种运行模式,我们项目选用的运行模式是基于 Docker 容器,架构图如下:

gitlabci运行架构

1. 安装 gitlab-runner

采用 Docker 的方式安装 gitlab-runner ,并且采用 Docker 的方式运行 Runner 。

GitLab 官方给出的 Docker 方式安装 gitlab-runner 文档路径: https://docs.gitlab.com/runner/install/docker.html

熟悉 docker-compose 的话,用 docker-compose 启动 gitlab-runner 更方便。

docker-compose 文件路径在服务器代码目录: tools/gitlab-runner/docker-compose.yml

gitlab-runner:
  container_name: gitlab-runner
  image: "gitlab/gitlab-runner:latest"
  restart: always
  volumes:
    - "/etc/gitlab-runner:/etc/gitlab-runner"
    - "/var/run/docker.sock:/var/run/docker.sock"
  environment:
    - "SET_CONTAINER_TIMEZONE=true"
    - "CONTAINER_TIMEZONE=Asia/Shanghai"
    - "TZ=Asia/Shanghai"

tools/gitlab-runner/ 目录执行 docker-compose up -d 命令即可启动容器。

2. 注册 runner

详细文档路径: https://docs.gitlab.com/runner/register/

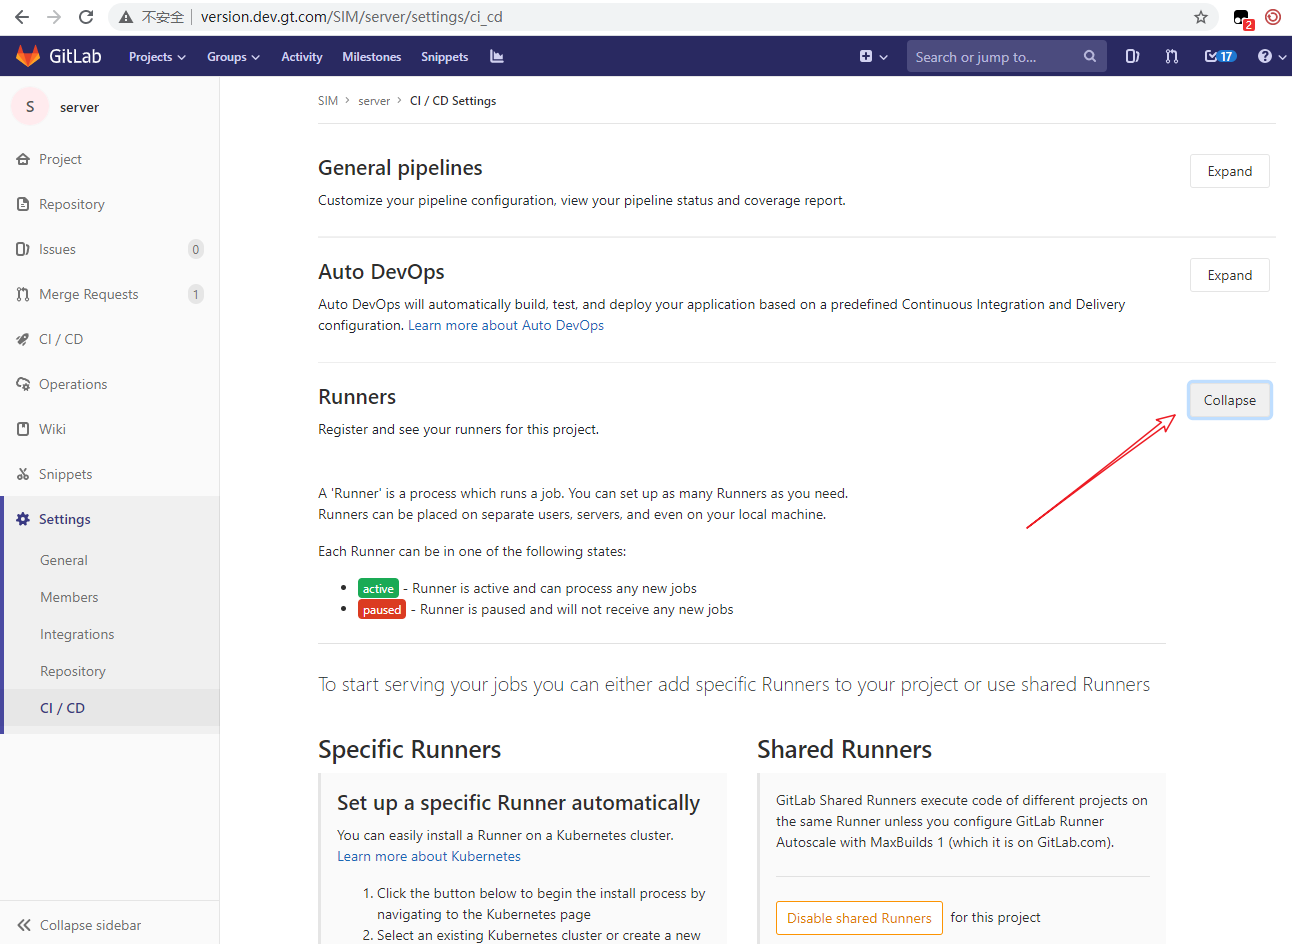
  1. 首先进入到 GitLab CI/CD 设置界面:
    gitlabci配置步骤1.png

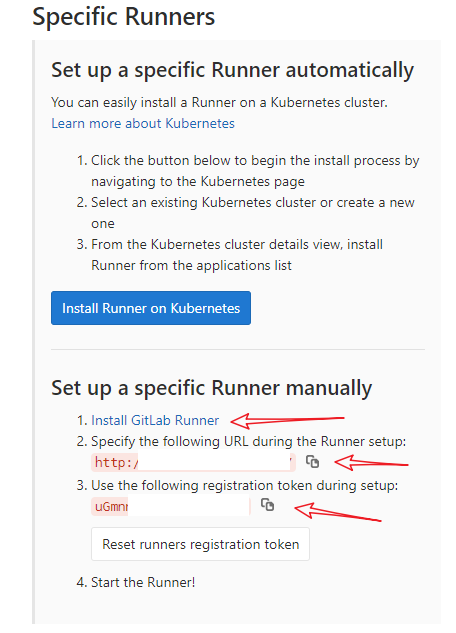
  2. 手动设置特殊 Runner 的界面,配置过程中将会使用到下面的 url 和 token :
    gitlabci配置步骤2.png

  3. 执行 gitlab-runner register 命令来注册。其中 url 和 registration-token 参数就是上面截图中的,docker-pull-policy 设置为 if-not-present 表示优先使用本地 docker 镜像,executor 设置运行方式为 docker ,docker-image 设置镜像名。

docker exec -it gitlab-runner gitlab-runner register --non-interactive \
  --url "http://192.168.29.252/" \
  --registration-token "uGmnn6P3mxxxxxxxxx" \
  --docker-pull-policy "if-not-present" \
  --description "runner-sim-server-build" \
  --executor "docker" \
  --docker-image sim-server-build

3. 准备好运行环境的 docker 镜像

这节是介绍我们的 sim-server-build 镜像是如何生成的。

脚本在服务器代码目录下: tools/docker-build/

.
├── build.sh
├── create.sh
├── Dockerfile
├── id_rsa
└── id_rsa.pub

create.sh 就是一行创建镜像的命令,表示创建镜像名字为 sim-server-build 的 docker 镜像,最后的 . 表示使用当前目录下的 Dockerfile 文件来生成镜像。

sudo docker build -t sim-server-build .

Dockerfile 比较简单,主要就是执行 build.sh 文件来安装我们项目依赖的工具和库:

FROM centos:7.6.1810

COPY build.sh /tmp/build.sh

RUN /tmp/build.sh && rm /tmp/build.sh

RUN mkdir /root/.ssh
COPY id_rsa /root/.ssh/id_rsa
COPY id_rsa.pub /root/.ssh/id_rsa.pub
RUN chmod 700 /root/.ssh
RUN chmod 600 /root/.ssh/id_rsa
RUN chmod 600 /root/.ssh/id_rsa.pub

RUN luarocks install luacheck

ENV SET_CONTAINER_TIMEZONE=true
ENV CONTAINER_TIMEZONE=Asia/Shanghai
ENV TZ=Asia/Shanghai

如何写 .gitlab-ci.yml

通过配置 .gitlab-ci.yml 文件来告诉 CI 要对你的项目做什么,它位于仓库的根目录下。

代码仓库一旦收到任何推送 (git push),GitLab 将立即查找 .gitlab-ci.yml 文件,并根据文件的内容在 Runner 上启动作业。

下面是我们服务器脚本代码的 ci 文件。

image: sim-server-build

variables:
  GIT_SUBMODULE_STRATEGY: recursive

stages:
  - test
  - deploy

job_test:
  stage: test
  script:
    - make build
    - make rpc
    - make check

job_deploy:
  stage: deploy
  script:
    - make deploy-debug
    - make deploy-release
  when: manual

image 定义了使用哪个 docker 镜像运行, variables 是用来配置环境变量的,这里配置了 GIT_SUBMODULE_STRATEGYrecursive 表示递归拉取 git submodule 。

stages 是用来定义有多少个执行阶段的,这里定义了 2 个阶段:

  • test 测试阶段,用于执行 make check 检查代码语法错误
  • deploy 打包阶段,用于打包代码给运维发布

job_testjob_deploy 定义了 2 个 job,stage 标记属于哪个阶段,script 就是该 job 执行的命令,when 为 manual 时表示需要手动在网页里点击按钮才执行 job 。

这里只定义了 2 个 job,其实一个阶段里面可以执行多个 job 的。下图介绍了以某个 pipeline 为例解释 pipeline , stage , job 的含义:

gitlabcipipeline

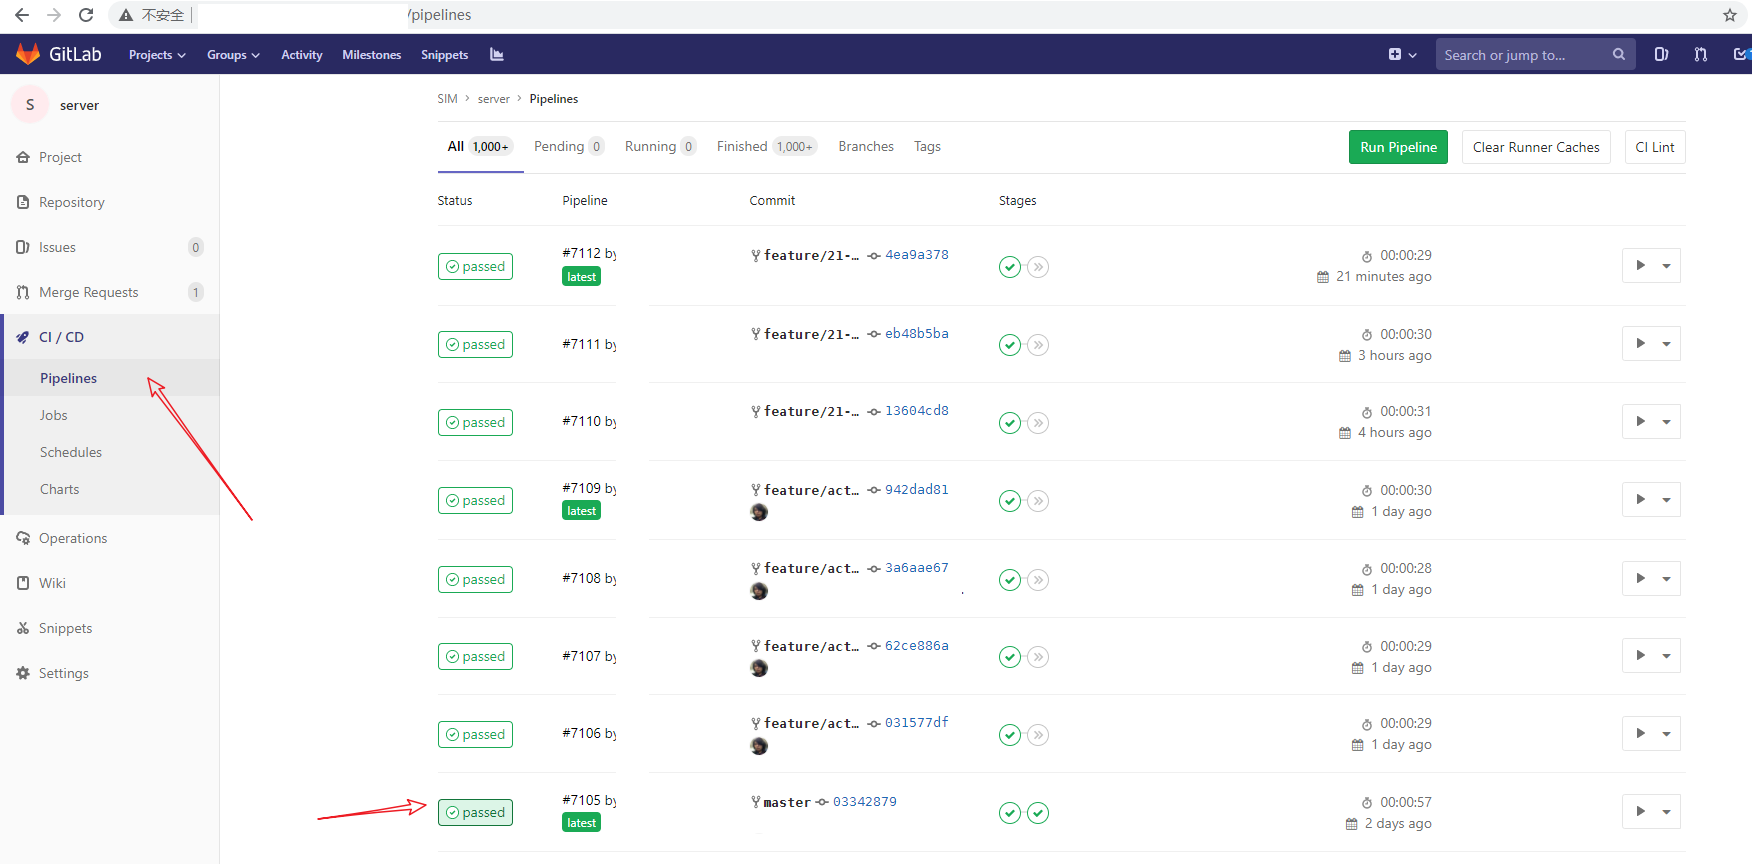
在网页里查看执行日志

  1. 进入到 pipeline 页面
    gitlabci查看运行日志1

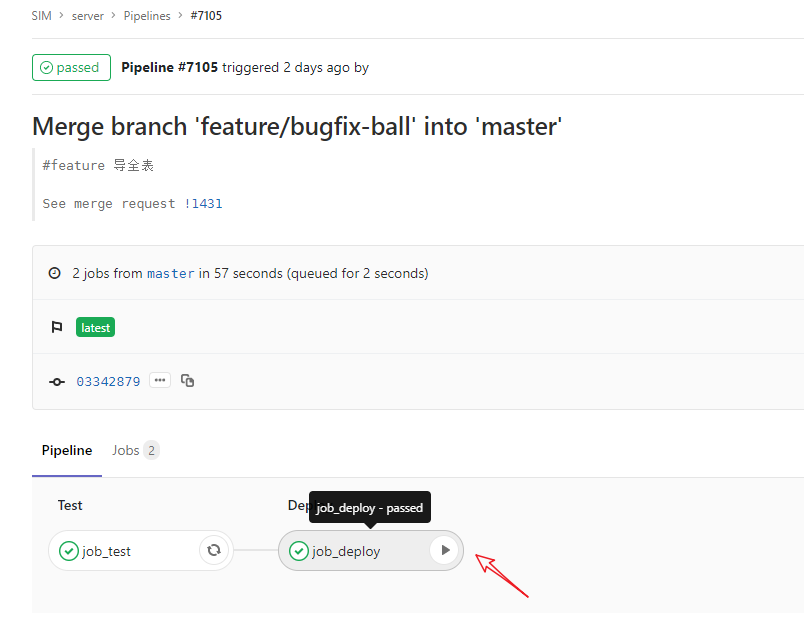
  2. 点击一个 pipeline 详情界面
    gitlabci查看运行日志2

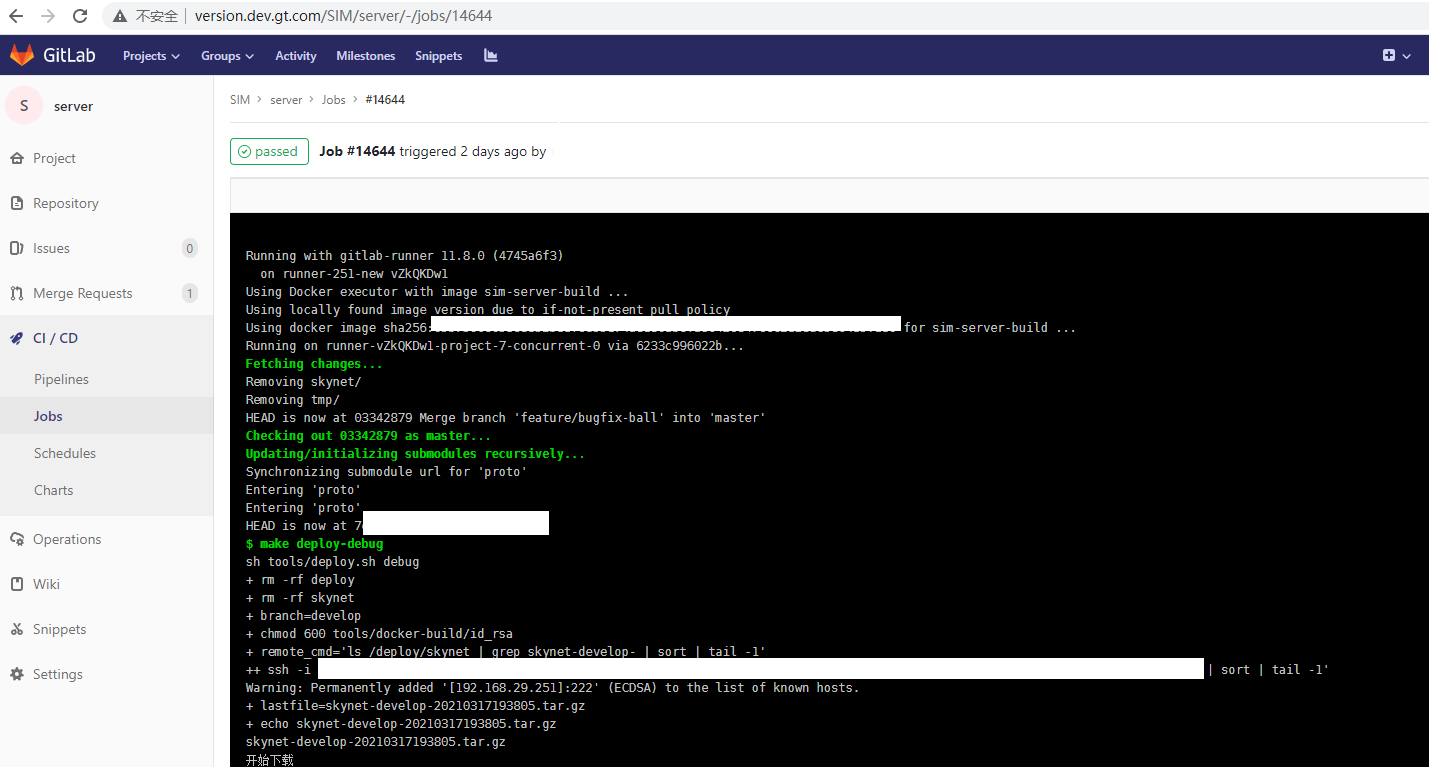
  3. 点击对应的任务
    gitlabci查看运行日志3

手动执行任务

点击任务上的播放按钮即可:
gitlabci手动执行任务

延伸学习

  • 持续交付 (Continuous Delivery) 和 持续部署 (Continuous Deployment)
  • GitLab CD
  • Kubernetes (k8s)

目前我们部署是交给运维处理的,如果是部署工作是我们研发这边做的话,可以使用 GitLab CD 自动部署到正式机器。

持续交付就是自动地从仓库将最新的程序部署到测试环境里,持续部署就是自动地将稳定版本部署到生产环境里,
最后发布时持续交付是手动操作,持续部署是自动操作。

持续交付和持续部署的区别

@hanxi hanxi added the 教程 label May 13, 2021
Sign up for free to join this conversation on GitHub. Already have an account? Sign in to comment
Labels
Projects
None yet
Development

No branches or pull requests

1 participant