Building
-
The Boost Unit Test Adapter for Visual Studio was mainly developed using Microsoft Visual Studio 2015.
-
In order for Visual Studio to be able to open all the projects within the Boost Unit Test Adapter solution, the Visual Studio Software Development Kit (SDK) needs to be installed. If the SDK is not installed for the Visual Studio version in which the Boost Unit Test adapter solution is opened with, Visual Studio will raise an error with the BoostTestPlugin project and tag it as incompatible with an error saying This project is incompatible with current edition of Visual Studio with no indication saying that the issue is that the Visual Studio SDK is not installed.
-
Please note that this may not be necessary when using Visual Studio 2015 (or later versions).
-
The Unit Test project for the adapter is based on NUnit testing framework. Development was done using Version 2.6.4.
-
The software components log4net, NUnit and FakeItEasy and several others are managed via the package manager NuGet which, starting from Visual Studio 2012, is included in every edition of Visual Studio apart from the Express/Community and the TFS editions.
As shown in the snippet below, the Boost Unit Test Adapter solution consists of 7 projects.

The solution is comprised of:
- Project Antlr.DOT which contains the ANTLR generated parser for DOT files/representations and ANTLR compilation dependencies.
- Project BoostTestAdapter which contains that majority of the logic and functionality offered of the Boost Unit Test Adapter.
- Project BoostTestAdapterNunit which is the Unit Test project so as to test the functionality of the Boost Unit Test Adapter. The project is based on the NUnit test framework.
- Project BoostTestPlugin which generates the Visual Studio extension installer package in VSIX format.
- Project VisualStudio2015Adapter is required for the different external assemblies references respective to the Visual Studio versions which, at the time of writing, boils down to the functionality contained in the namespace Microsoft.VisualStudio.VCProjectEngine.
- Project VisualStudioAdapter consists of interfaces which were required so as to be able to adapt several Visual Studio versions under one API. This is also used within the Unit Test project to be able to fake Visual Studio instances.
- Project VisualStudioAdapterNunit which is the Unit Test project so as to test the functionality of a Visual Studio Adapter. The project is based on the NUnit test framework.
The Boost Unit Test adapter is versioned via the source.extension.vsixmanifest file in the BoostTestPlugin project, which as shown in the below snippet, upon clicking the file, a form is presented allowing the user to change the version number amongst many other settings.

The version number consists of 4 segments, namely: <major version>.<minor version>.<revision>.<build number>. It is important to remember to update the version number when generating an updated package because in case the extension is already installed with the same version number, the updated package cannot be installed. Please refer to this MSDN page for more info on how to update a Visual Studio Extension.
Owners of the master branch should update the build number whenever the project is intended for release. For release purposes, either the <major version> number, <minor version> number, <revision> number or a combination thereof should be updated. The <build> number is automatically update via continuous integration and should thus be set to 0 within the manifest file.
Building the project just requires the user to select the desired solution configuration (Debug or Release) and press the Build button in the Visual Studio IDE. A VSIX file called BoostUnitTestAdapter.vsix will be created under the bin\<selected configuration name> folder of the BoostTestPlugin project.
The process of debugging and stepping through the Boost Unit Test Adapter code is:
- The solution must be in a buildable state.
- The BoostTestPlugin must be set as the startup project. This is done by clicking on the Set as StartUp project in the right click context menu upon the BoostTestPlugin project.

- Option Start external program in Properties -> Debug of the BoostTestPlugin needs to be set, as shown in the snippet below.

-
Make sure that Deploy VSIX content to experimental instance for debugging is checked in the VSIX tab of the BoostTestPlugin project properties.
-
A specific compilation symbol need to be set for project BoostTestAdapter. This is done via by accessing Properties -> Build and inserting the text LAUNCH_DEBUGGER in the text box along side Condtional compilation symbols as shown in the below snippet. The solution configuration needs to be set to Debug and the Define DEBUG constant checkbox needs to be checked.

- Press Start without Debugging as shown in the snippet below or via the keyboard shortcut CTRL+F5. This will launch a so called Experimental Instance of Visual Studio. An experimental instance can be easily identified via the text Experimental Instance visible in the title bar of the Visual Studio IDE window.


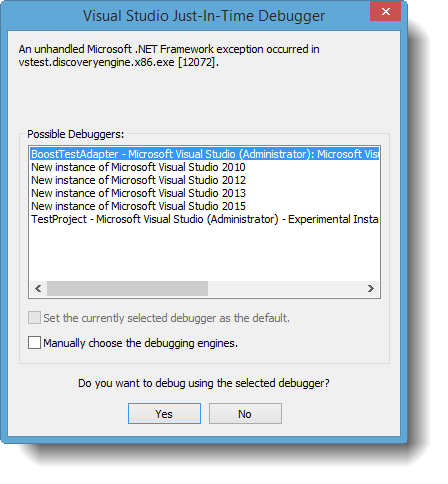
- Open a test C++ project. Just after opening and assuming the that the Text Explorer window in the experimental instance of Visual Studio is visible, a form saying that An unhandled Microsoft .NET Framework exception occurred in vstest.discoveryenginex86.exe will appear as shown below.

- Click Yes, debug vstest.discoveryenginex86.exe and another form will appear asking for a Visual Studio instance, as shown below. If the experimental instance was started without a debugger attached (as instructed in Step 5), the Visual Studio instance that was used to launch the experimental instance will be presented amongst the list and needs to be selected.
- Upon clicking yes, the user will be switched to a particular line of code in the Visual Studio instance that was used to launch the experimental instance. The user can now continue debugging the program flow as with any other C# code.
