-
Notifications
You must be signed in to change notification settings - Fork 6
Understanding templates
| ANNOUNCEMENT |
|---|
| OOoLilyPond has moved to a new repository: |
| https://github.com/OOoLilyPond |
| All past/present/future development can be found at the new location. The page you are viewing right here contains all development up to V. 1.0.1, but it will no longer be maintained. |
Templates are *.ly files that are located in OLy's template folder. You can view (and change) its location in the Config dialogue: see Template path.
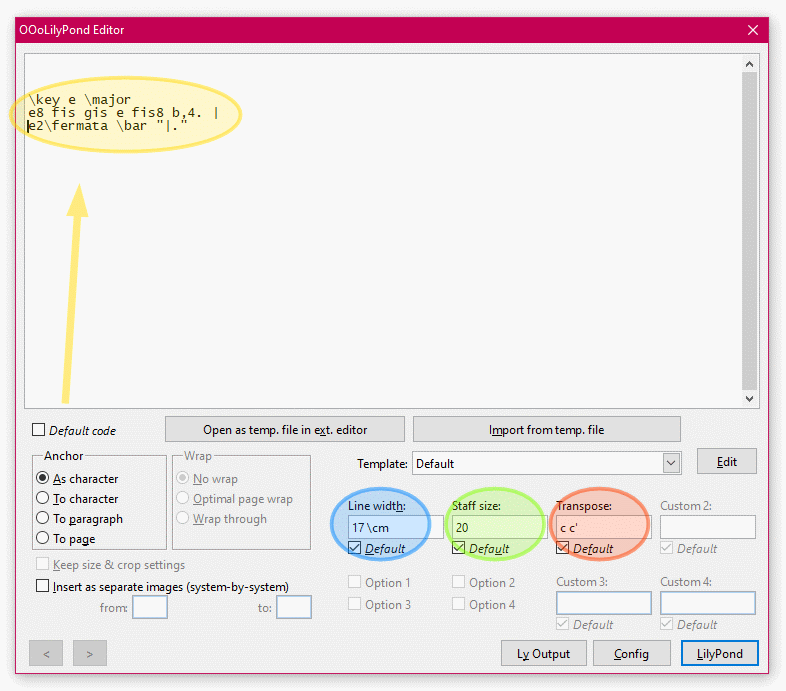
As explained in the tutorial, each input field (Code, Line width, Staff size, Custom1, Custom2, Custom3, Custom4) has a corresponding pair of tags in the template:
%{OOoLilyPondCode%}  ........  %{OOoLilyPondEnd%}
%{OOoLilyPondLineWidth%}  ...  %{OOoLilyPondEnd%}
#!OOoLilyPondStaffSize!#  ...  #!OOoLilyPondEnd!#
%{OOoLilyPondCustom1%}  .....  %{OOoLilyPondEnd%}
%{OOoLilyPondCustom2%}  .....  %{OOoLilyPondEnd%}
%{OOoLilyPondCustom3%}  .....  %{OOoLilyPondEnd%}
%{OOoLilyPondCustom4%}  .....  %{OOoLilyPondEnd%}
Whatever is enclosed by such a pair of tags will be displayed and can be edited in the corresponding field of the OLy Editor window.
\transpose %{OOoLilyPondCustom1%}c c'%{OOoLilyPondEnd%}
{
  %{OOoLilyPondCode%}
  \key e \major
  e8 fis gis e fis8 b,4. |
  e2\fermata \bar "|."
  %{OOoLilyPondEnd%}
}

\include "lilypond-book-preamble.ly"
#(set-global-staff-size #!OOoLilyPondStaffSize!# 20 #!OOoLilyPondEnd!#)

\paper {
  #ragged-right = ##t
  line-width = %{OOoLilyPondLineWidth%}17\cm%{OOoLilyPondEnd%}
}

\layout {
  indent = #0
  \context {
    \Score
    \remove "Bar_number_engraver"
  }
}

% %{OOoLilyPondCustom1Label%}Transpose:%{OOoLilyPondEnd%}
When you hit the "LilyPond" button, OLy inserts the contents of the editor fields at their position in the template and saves all this to a file OOoLilyPond.ly. Then LilyPond is called to compile this file to an image which is then inserted into your document.
Of course, the "Code" section must be in use. All other tag pairs can be omitted if you don't need them. The example above does not use the "Custom2" to "Custom4" tag pairs. Then those field appear greyed out in the Editor window:
If you want to paste ordinary code from existing *.lyfiles into OLy, use the template Direct to LilyPond. It only consists of a "Code" tag pair and contains no "invisible" parts at all. But please keep in mind that the resulting graphic should be smaller than your paper size.
There are two ways to achieve this:
-
(The complicated way) In your LilyPond code, set
paper-widthandpaper-heightto appropriate values manually. -
(The easier way) As in other templates, make use of
\include "lilypond-book-preamble.ly".
Typical templates (the ones without SVG inside the file name) contain the line \include "lilypond-book-preamble.ly" which will make the compilation result in a cropped image. That means, any whitespace around the sheet music is automatically removed.
(In [SVG -dcrop] versions of OLy's templates, you won't find the "preamble" line. Here the cropping is achieved by calling LilyPond with an additional -dcrop parameter. With [SVG] templates, there is no cropping.)
The "Edit" button will open a new dialog where you can edit the current template. Optionally, you can save it under a new file name.
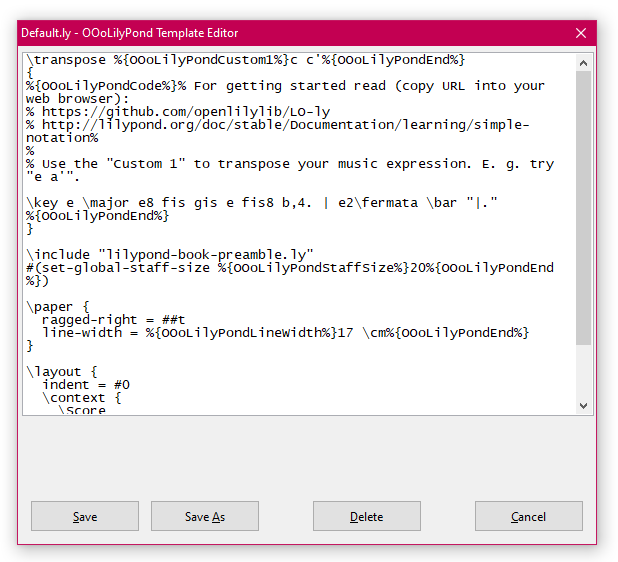
Be careful: Changing an existing template will affect all OLy objects that are based on it. Therefore it might be preferrable to choose a new name.
OLy's Template editor window only has very limited capabilities. It will be much more comfortable to use a text editor of your choice. You can select all the text in the text field by pressing [Ctrl]-[A], copy it into the clipboard with [Ctrl]-[C] and paste it into your text editor - usually with [Ctrl]-[V]. After modifying, move it back to OLy's template editor window in the same way.
You can have direct access to your template files by opening the template folder in your File Manager / Explorer. All *.ly files from there will be listed in OLy's template dropdown box. If you don't know where your template folder is located on your computer, open the Config dialogue and see Template path.
When you create templates of your own, make sure you have a LilyPond file that compiles without errors. The part of your code that you want to be accessible through the big editor pane in the OLy window must be enclosed in the tag pair
%{OOoLilyPondCode%} ... %{OOoLilyPondEnd%}. If you want to use the small text fields, do the same with the LineWidth, StaffSize, Custom1, Custom2, Custom3 and Custom4 tag pairs.
The tags themselves don't disturb your Ly file because they are block comments, that means anything between the character sequence %{ and %} is ignored by LilyPond upon compilation.
You might have noticed above that the "StaffSize" tag pair looks somewhat different:
#!OOoLilyPondStaffSize!# ... #!OOoLilyPondEnd!#
The sequences #! and !# are the scheme block comments. This is required because a line like
#(set-global-staff-size 20) is a command in scheme (a programming language that you don't necessarily have to love, but that you cannot avoid either when working with LilyPond).
Therefore, no matter if your templates use the #!OOoLilyPond...!# or %{OOoLilyPond...%} writing, OLy will use the scheme version for the "StaffSize" tags and the normal version for anything else.
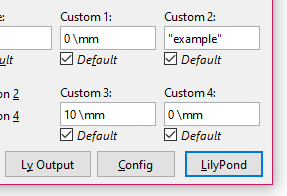
The six input fields Line Width, Staff Size, Custom 1, Custom 2, Custom 3 and Custom 4 will change from text input fields to checkboxes if they are filled with a boolean value (##t or ##f) AND if the current template intends to use a boolean value there. This can be helpful for usages like
ragged-right = %{OOoLilyPondCustom2%}##t%{OOoLilyPondEnd%}
which can now be treated like this:
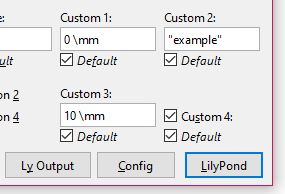
As setting the staff size in LilyPond requires a scheme command, the Staff Size field uses scheme block comments #! and !#. Therefore, when turned into a checkbox, it also produces the scheme versions of boolean values: #t and #f.

The captions of the four input fields can be customized inside the template using the new OOoLilyPond...Label command. For example, to change the "Custom 1" caption into "Transpose:", put the following line into the template code:
% %{OOoLilyPondCustom1Label%}Transpose:%{OOoLilyPondEnd%}

Similar tag pairs also exist for the "LineWidth", "StaffSize" and "Custom2" to "Custom4" fields:
% %{OOoLilyPondLineWidthLabel%} ... %{OOoLilyPondEnd%}
% %{OOoLilyPondStaffSizeLabel%} ... %{OOoLilyPondEnd%}
% %{OOoLilyPondCustom2Label%} ..... %{OOoLilyPondEnd%}
% %{OOoLilyPondCustom3Label%} ..... %{OOoLilyPondEnd%}
% %{OOoLilyPondCustom4Label%} ..... %{OOoLilyPondEnd%}
- The comment sign
%at the beginning of the line is necessary because otherwise theTranspose:string would be "visible" to LilyPond and certainly cause a compilation error. -
OOoLilyPondtags cannot be nested, so the aboveOOoLilyPond...Labelcommand cannot be used inside another tag pair, e.g. theOOoLilyPondCodesection.

In addition to the input fields, there are four checkboxes that produce the boolean values True or False.
Those values can "switch" sections of code on or off. For example, any code between the two tags %{OOoLilyPondOption3True%} and %{OOoLilyPondEnd%} will stay visible to LilyPond if Option 3 is True. It will be commented out using block comments %{ and %} if Option 3 is False. Therefore it must not contain any further block comment signs.
Likewise, code between the tags %{OOoLilyPondOption3False%} and %{OOoLilyPondEnd%} will stay visible to LilyPond if Option 3 is False and will be commented out if Option 3 is True.
You can use both those pairs of tags in a template, but none of them can be used multiple times.
Here is a (simplified) example from a demo template. When Option 3 is set to True, this is what will be passed to LilyPond:
\layout {
  \context {
    \Staff
    %{OOoLilyPondOption3False%}%{ \remove "Time_signature_engraver" %}%{OOoLilyPondEnd%}
    %{OOoLilyPondOption3True%}\numericTimeSignature%{OOoLilyPondEnd%}
  }
}
With Option 3 set to False, you will get
\layout {
  \context {
    \Staff
    %{OOoLilyPondOption3False%}\remove "Time_signature_engraver"%{OOoLilyPondEnd%}
    %{OOoLilyPondOption3True%}%{ \numericTimeSignature %}%{OOoLilyPondEnd%}
  }
}
The captions for option checkboxes can be customized in the same way as for the input fields described above:
% %{OOoLilyPondOption1Label%}Bar numbers%{OOoLilyPondEnd%}
% %{OOoLilyPondOption2Label%}Bars%{OOoLilyPondEnd%}
% %{OOoLilyPondOption3Label%}Time sig.%{OOoLilyPondEnd%}
% %{OOoLilyPondOption4Label%}Stems%{OOoLilyPondEnd%}
Again, don't forget the comment sign % at the beginning of the line.

A similar mechanism is used for providing a default value in the template:
% %{OOoLilyPondOption1Value%}##f%{OOoLilyPondEnd%}
% %{OOoLilyPondOption2Value%}##t%{OOoLilyPondEnd%}
% %{OOoLilyPondOption3Value%}##f%{OOoLilyPondEnd%}
% %{OOoLilyPondOption4Value%}##t%{OOoLilyPondEnd%}
A word on backwards compatibility: Can templates that contain those new tags be used with older OLy versions? Short answer: It depends.
Versions up to 0.5.12 don't know those new "Option" tags. They will ignore the tag pairs as well as the code enclosed by them. This will only be a problem if both tag pairs (...True and ...False) for a checkbox are in use and must not both be omitted at the same time.
It's also possible to include a template inside the OLy object (the config dialogue offers you a checkbox to switch on this feature).

If you send your document to someone else, now you don't have to worry about missing templates.
To save an included template as *.ly file again, click the "Edit" button at the template section of the OLy Editor window. The template editor opens and shows the content of the template. Here you can modify it and save it under the default name or a new name.
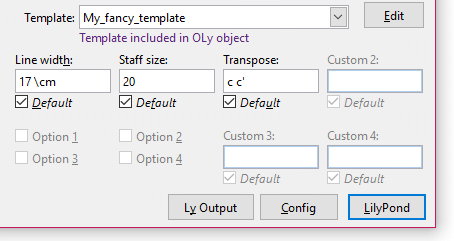
Below the "Template" field, OLy will indicate if the template is found in a location other than the template folder, i.e. a subfolder or the containing LO document's folder or included in the OLy object.
There is also a hint if no template with the given name is found.
If you have old templates that you don't actively use anymore, but which might still be needed for older documents, you can put them in an subfolder of your regular template folder. They won't be shown in the template list of the editor window, but OLy will still find them if an object needs them.
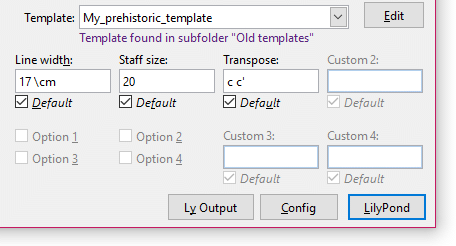
When an OLy object is opened for editing, OLy will look for a template with a matching name in the following order:
- Templates that are included in the object have highest priority. They will be used even if a template with the same name can be found inside the template folder.
- Next, OLy checks if a matching template file can be found in the folder where the LibreOffice / OpenOffice document file is stored. Templates that are located there will also have priority over the built-in ones.
- Now OLy looks in its regular template folder.
- If the template folder does not contain a matching file, its subfolders will be scanned.
You can also directly type in a template's name. This also works with templates in subfolders or the LO document's folder.
Launching for the 1st time
How to work with OLy
Templates
Language settings
Using an external editor
Other graphic file formats
Separate images
Batch processing
Input fields
Editing
Tags
Customizing captions
"Option" checkboxes
Include template in object
Default values
Appearance
Paths, executables etc.
Format
Buttons
| PDF to SVG
| PNG
|
| SVG (dcrop)
| EPS
|
SVG: providing fonts
SVG: older templates
SVG: manual cropping
Bitmap vs. vector
