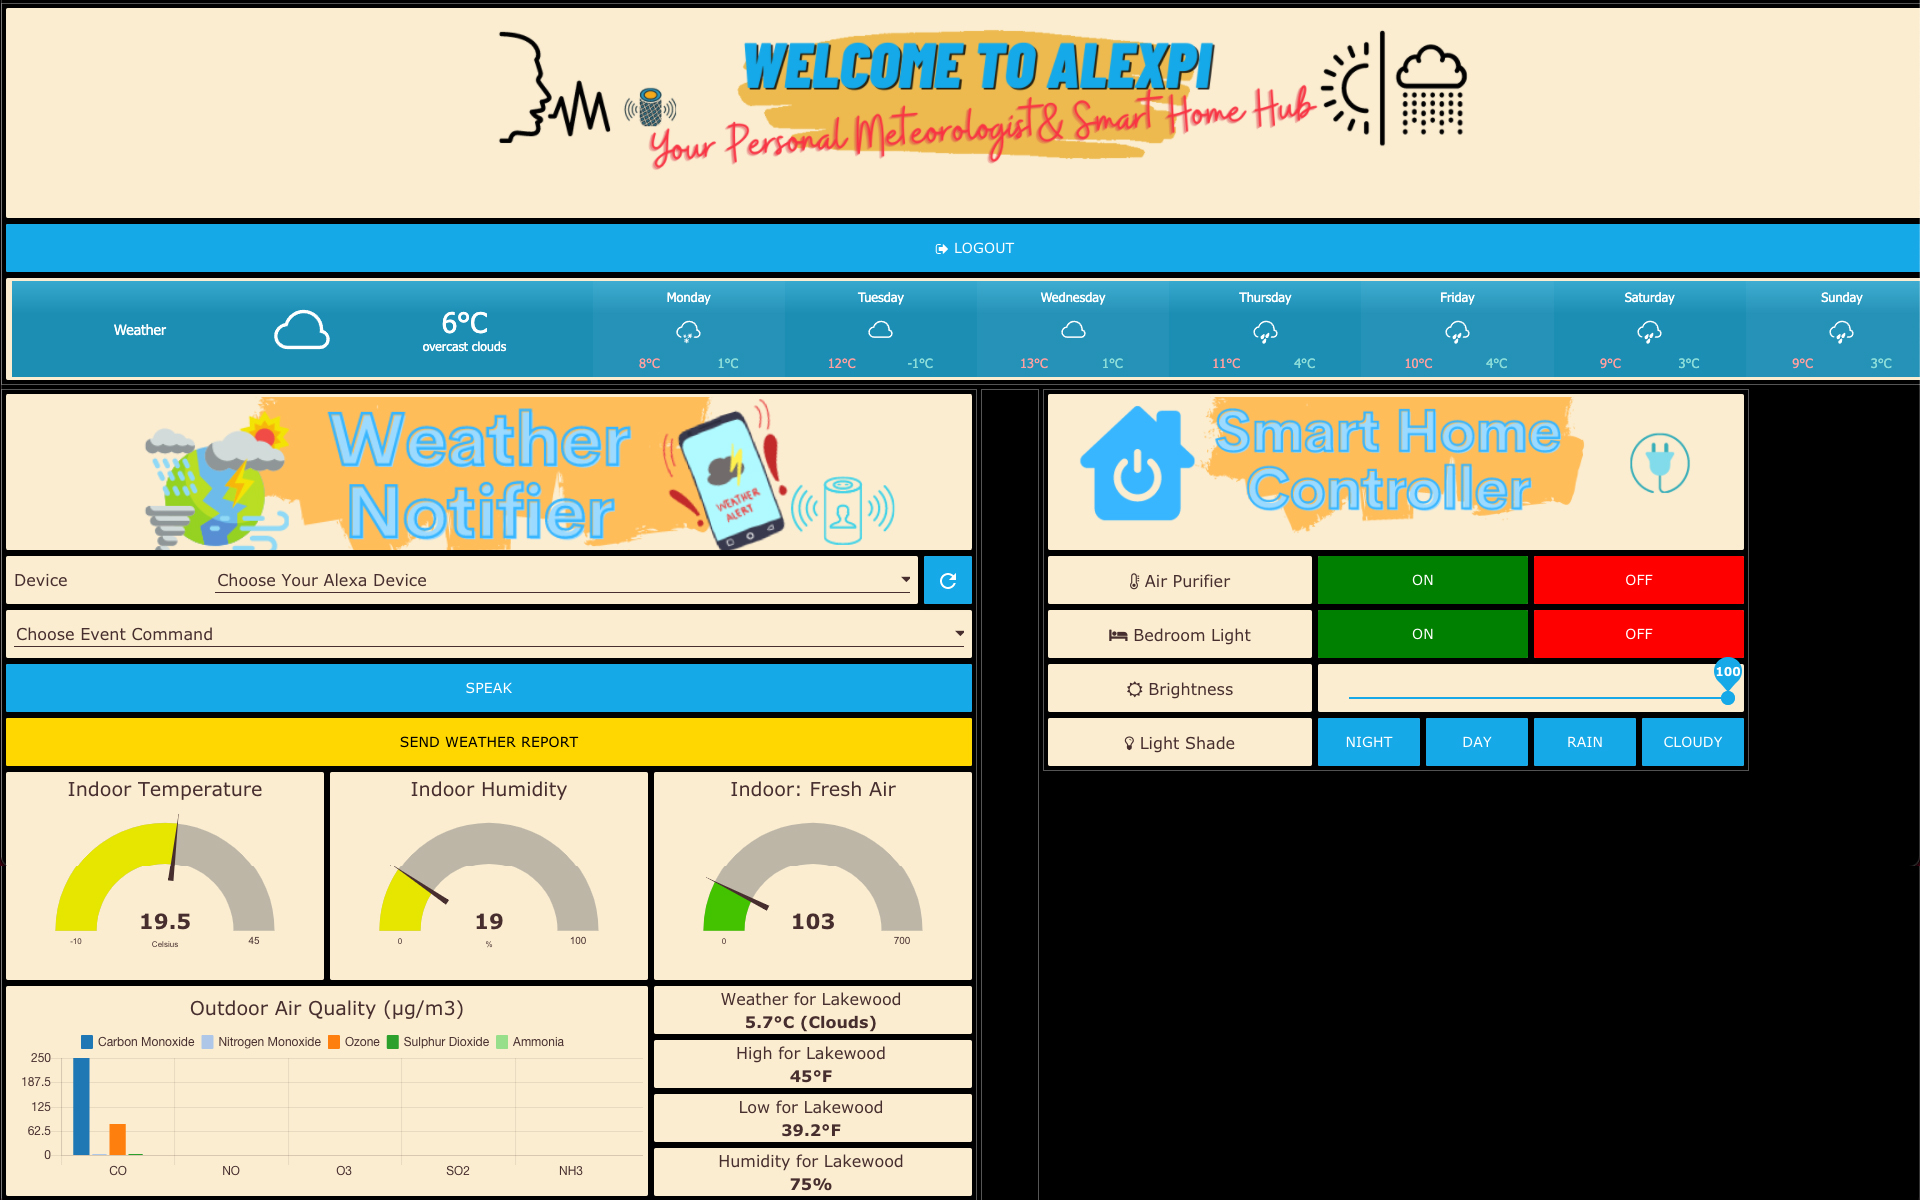
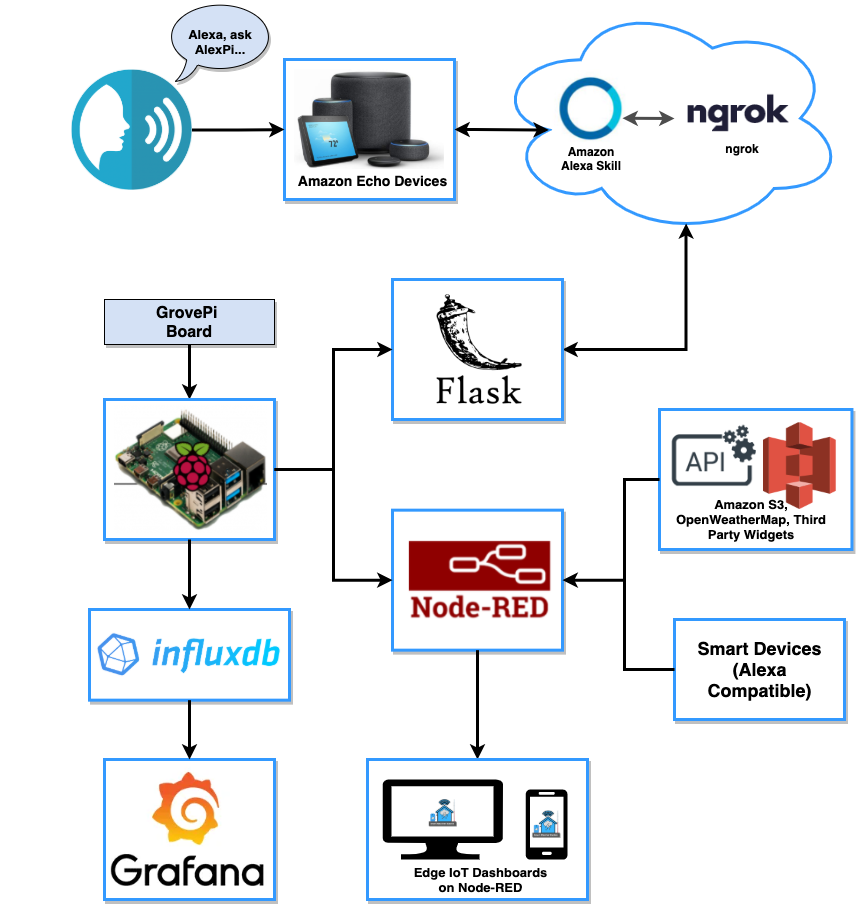
The purpose of this project is to design and implement a practical case of a smart home hub using Raspberry Pi. We propose a cheaper solution to build a smart home hub to monitor both indoor and outdoor temperature and air quality that can be expanded overtime, and comes with user-friendly IoT edge-based dashboards for authenticated users to automate and control Amazon Alexa-integrated smart home devices; and view historical data. Our system is integrated with Amazon Alexa Skill which gives users the ability to issue voice commands from Amazon Echo devices or remotely from the Alexa Mobile application.
├── Alexa
│   ├── AlexPi.json
│   ├── AlexaSkill.py
├── Grafana
│   ├── AlexPI_Advanced_Statistics_Dashboard.json
├── Node-Red
│   ├── AccountHandling-Flow.json
│   ├── AlexPi-Flow.json
│
Alexa/: stored Python script to run Flask application and schema exported from Alexa Skill Kit serviceGrafana/: Stored Grafana JSON format dashboardsNode-Red/: Stored Node-RED flows
- Programming Language: Python3, JavaScript
- Database: InfluxDB
- Edge Dashboard: Node-RED, Grafana
- Other Services: Amazon Alexa Skill Kit, ngrok, OpenWeatherMap API, AWS S3
- Raspberry Pi 3 B+
- Grove - Temperature and Humidity Sensor: Used for monitoring indoor temperature and humidity
- Grove - Ultrasonic Sensor: Used for detecting motion
- Grove - Air Quality Sensor: Used for monitoring indoor air quality conditions
- Grove - Light Sensor: Used for detecting indoor light
- Grove - LED: Used to indicate the status of indoor air quality, light detection and debugging
- Amazon Echo Devices: Echo Show (for voice command and display result on screen) and Echo Dot (for voice command)
- Android or iOS device: Used for receiving notifications and remotely sending voice commands (through Alexa mobile app)
- Alexa-Compatible Smart Devices (Smart bulb and smart plug): Used for controlling and automating smart home
- Expose a local web server to the Internet:
- Create ngrok account
- Configure ngork on Raspberry Pi
- Configure new Alexa Skill on Amazon Alexa Skill Kit Service:
- Create Amazon Developer account
- Create new Alexa Skill on Amazon Alexa Skill Kit Service
- Install Flask and Flask_Ask to write Python3 script and run Flask application locally
- Configure InfluxDB on Raspberry Pi
- Connect required sensors to GrovePi board
- Install node-red-contrib-alexa-remote2 package on Node-RED and configure it with Amazon Alexa account
- Integrate Grafana with InfluxDB
In this project, we will be running two web servers concurrently with different port numbers:
- 5000: Run Flask application to build new Alexa skills with Amazon Alexa Skill Kit Service on Cloud
- 8086: Run Node-Red to launch local IoT dashboard, control smart devices and insert data into InfluxDB
ngrok is used to expose a web server running on your Raspberry Pi to be publicly accessbile on the Internet so that it can communicate with Alexa Skill Kit Service.
- Create a free ngrok account: dashboard.ngrok.com/signup
- Copy the authentication token found in your ngrok dashboard
- Open Terminal and run the following commands to download and install ngrok:
wget https://bin.equinox.io/c/4VmDzA7iaHb/ngrok-stable-linux-arm.zipunzip ngrok-stable-linux-arm.zip - Connect to your account with the authentication token copied from your ngrok account:
./ngrok authtoken <AUTH_TOKEN> - Start a HTTP tunnel forwarding to your local port 5000:
./ngrok http 5000 - Copy the Forwarding HTTPS URL on the terminal (You will need this endpoint when you configure Alexa Skill Kit Service later)
- Do not close the ngrok terminal. Keep it running.
Full instruction on how to setup ngrok on Raspberry Pi can be found here: https://www.dexterindustries.com/howto/access-your-raspberry-pi-from-outside-your-home-or-local-network/
- Create Amazon Developer Account:
https://developer.amazon.com/ - Open Developer Console and launch Alexa Skill Kit:
https://developer.amazon.com/alexa/console/ask - Create a new skill and fill in the required fields based on your developer environment
- Launch the newly created skill
- Expand Interaction Model and go to JSON Editor: Paste in the JSON file (AlexPi.json) from the /alexa directory
- Go to Endpoint menu and select HTTPS: In Default Region section, paste in the HTTPS URL generated from ngrok
- Save and click on Build Model
- Once you get the above steps setup, open terminal and navigate to where you store AlexaSkill.py file, - Run:
python3 AlexaSkill.py(or run directly from IDE)
- Install InfluxDB on the Local Raspberry Pi
- Create User with with all priviledges
- Create Database on the InfluxDB server that has been created locally
- Install
node-red-contrib-influxdbpackage on Node-RED - Configure the InfluxDB output and input nodes on both node red flows using the user and database that was created.
- Install
node-red-contrib-alexa-remote2package on Node-RED and configure it with your Amazon Alexa account - Navigate to
Node-Reddirectory in this project source code and importAccountHandling-Flow.jsonandAlexPi-Flow.jsonto Node-RED - Update any Alexa Routine Nodes in Smart Weather flow to match with your smart home devices
- Update any sensors in Smart Weather flow to match with your Raspberry Pi and GrovePi setup
- Update any influxdb-out node on both AccountHandlig and Smart Weather flows
- Install Grafana and run on the Local Raspberry Pi
- Create User Account on Grafana.
- Add Datasource on grafana, configure it to the created InfluxDB database
- Select new Dashboard and import
AlexPi_Advanced_Statistics_Dashboard.jsonfrom the /Grafana directory - Configure time series and username to your liking
- We are using the free version of ngrok so we do not have any reserved domains for the endpoint. For free version, the HTTPS URL endpoint from ngrok is updated each time you start a tunnel. You must also update Endpoint on Alexa Skill Kit service with the new HTTPS endpoint each time the endpoint from ngrok is changing.
- The Flask web server is running on port 5000. If you already use this port number for other purposes, please update the port number in AlexaSkill.py file.
| Edge-based IoT Dashboard (Node-RED) | Edge-based IoT Dashboard (Grafana) |
|---|---|
 |
 |
