Model
As with other tools, the scene graph should follow the structure described in the template for the target submission type.
Blender requires unique names for objects and will append numbers to duplicate names. These will be ignored on export. For example, "Hull.002" will be exported as "Hull".
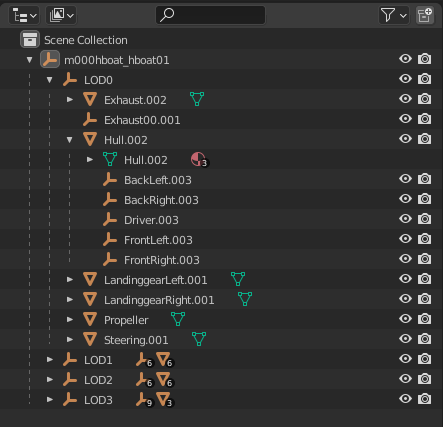
Only Empty and Mesh objects will be exported. To assist with designing, Light and Camera objects can be added without affecting the exported model.
Empty > Plain Axes is used for nodes that do not have a mesh, such as a seating location.
![]()
For the root object, the Location and Rotation are ignored while the Scale should remain as 1.
The root node contains the LOD distances in the Custom Properties section.

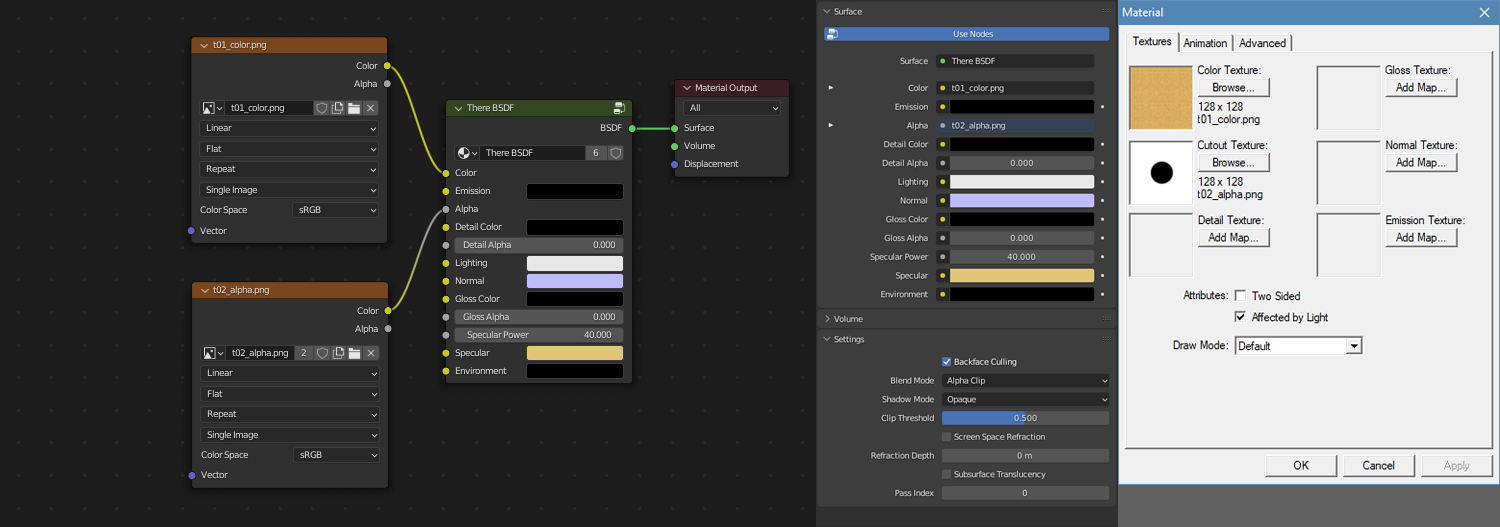
Materials are configured using the There BSDF shader, which is bundled with this project and was designed to correspond to There's material system.
Although the default Principled BSDF shader can also be used, some configurations may be more complicated or miss features.
To view materials, be sure the Viewport Shading is set to Material Preview or Rendered.

The following describes how the material inputs correspond to the settings in Previewer using the There BSDF shader.
Many settings can be set from the Material Properties panel, but the Shader tab is more comprehensive and provides the best experience.
The simplest configuration is using an Image Texture for the Color input. This will be shaded using the world lighting.

To give the appearance of an illuminated object, connect an Image Texture to the Emission input.

To achieve a blended draw mode in There, the Image Texture that is connected to Color or Emission should also connected to the Alpha input.
In addition, select Alpha Blend as the Blend Mode in the Settings panel.

To achieve a chromakey draw mode in There, the Image Texture that is connected to Color or Emission should also connected to the Alpha input.
In addition, select Alpha Clip as the Blend Mode in the Settings panel.

A separate Image Texture with the Color output connected to the Alpha input can be used as an opacity by selecting Alpha Blend as the Blend Mode.

A separate Image Texture with the Color output connected to the Alpha input can be used as a cutout by selecting Alpha Clip as the Blend Mode.
A per-pixel emissive effect can be configured by connecting an additional Image Texture to the Emission input.
Note that this is a DX9 only feature.

An Image Texture connected to both the Detail Color and Detail Alpha inputs will overlay the Color image. It should be configured with a UV Map set to a second UV channel (see the "Adding a second UV" section below).

An Image Texture connected to the Lighting input will apply baked lighting to the Emission image. It should be configured with a UV Map set to a second UV channel (see the "Adding a second UV" section below).

An Image Texture connected to the Normal input can be used to fake bumps and dents on the surface of an object without requiring additional vertices.
For proper viewing, the Color Space should be set to Non-Color.
Tools such as GIMP, CrazyBump, and AwesomeBump can be used to create the normal images.
When using a normal image, the exporter will also include tangents and bitangents in the mesh.
Note that this is a DX9 only feature.

An Image Texture connected to the Gloss Color and Gloss Alpha inputs will influence the shininess and/or reflectivity of a surface.
A low alpha value will produce specular highlights while a high alpha value will produce a reflection of the environment (specifically, the sky).
In addition to the image are the Specular Power (0-511), Specular, and Environment properties.
Dan Samuel wrote some useful information regarding glossy materials. It was written for an older version of Blender (2017) and the COLLADA workflow, so the step-by-step does not apply.
Note that this is a DX9 only feature and currently does not render in Blender.

Under the Settings section, check Backface Culling for single sided and uncheck for two sided. This is opposite of the checkbox in Previewer.

A second UV can be added from the UV Maps section of the Object Data Properties. This is only used for detail or lighting textures.

Gmax and 3ds Max use Smoothing Groups to define different regions of smoothness.
Blender uses a different approach. With Auto Smooth enabled in the Normals section, faces can be shaded smoothly.
To have full control over sharp edges, click Add Custom Split Normals Data if not already added.

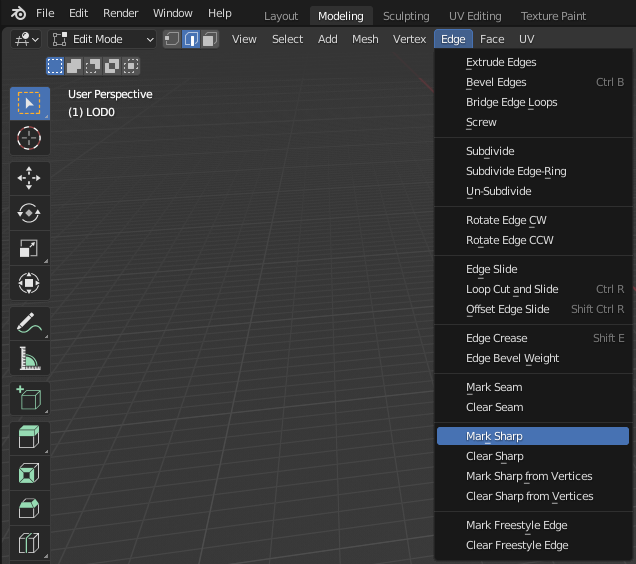
Edit Mode can be used to adjust the smooth regions by selecting edges and using the menus Edge > Mark Sharp or Edge > Clear Sharp. The sharp edges will appear light blue.
The Normals visualization tool in Viewport Overlays can assist with adjusting the shading.

Blender's documentation contains more information about this subject, as there are many methods for shading an object.
The model is exported by using the menu File > Export > There Model (.model).
In addition, an optional Previewer Settings file (.preview) can be saved with the material configuration. Note that Previewer may require a refresh (F5) when loading this file to view the correct settings.
Any errors or warnings are displayed at the bottom of the window. Use Window > Toggle System Console for additional details.

-
Emission,NormalandGlossare DirectX 9 (DX9) features only. -
Glossis not currently visible in Blender. Use Previewer to view. - There seems to be a limitation to the number of mesh components in a model file. As such, it is not possible to use
Normal(which adds tangents and bitangents) along with vertex colors or a second UV.